Blender 3.6 Turbo Tools v.3.1.0 FREE 2023 UPDATE Download
Major Feature Release – Turbo Tools V3 now with Temporal Stabilizer and the option to use animation optimised sample pre-sets!
Turbo Tools is a full rendering pipeline addon, compatible with all operating systems and hardware supported by Blender. The addon includes:
Turbo Render – Vastly superior render results in a fraction of the time for both CPU and GPU Cycles rendering. Retains image quality the standard denoisers can’t maintain, in some cases even when providing them with images rendered for 120X longer! For complex scenes you can expect your single frame renders to be reduced from several hours to several minutes! Check out the below video to see how Turbo Render was able to get a gtx 1070 to destroy an rtx 4090!
Temporal Stabilizer – Although only a single checkbox, this massive new feature provides per pass temporal stabilization, allowing animation render times of static scene elements to be reduced by up to 40x! Check out the YouTube introduction video to find out more:
Turbo Comp – A full compositor suite with real-time playback and compositing directly in the compositor backdrop, branch caching, resaving of file output nodes without re-rendering, automatic file output node creation, publishing and lots more.
TURBO RENDER
In difficult to render scenes (indoor scenes, volumes, scenes containing glossy materials with detailed textures, SSS, etc) Turbo Render provides results that OIDN/Optix could require you to render up to 120x longer in order to match Turbo Render’s results. When no denoiser is used you could expect to render up to 960x longer to achieve the same results produced by Turbo Render (scene dependant). Additionally it simplifies the entire rendering process thanks to render setting pre-sets designed to help you get the result you need without diving into the complex render settings. It even works with complex compositing setups without the need to do any rewiring yourself! The results are remarkable as can be seen below.
Classroom scene using the new draft mode. Total render time (including denoising) was under 17 seconds on a gtx1070 with an i7-7700k !!!!!!!!
The following tests were created using cycles X in blender 3.1. To give OIDN and Optix the best possible chance, they were set to use albedo and normals to assist with the denoising process. OIDN had Prefilter set to Accurate, and I also tried setting prefilter to NONE to see if it would improve the texture comparison results (it didn’t).
Scene 1 – heavy DOF , strong SSS, film set to transparent to test alpha.
Click here to download test scene 1
Test scene 2 Available from the shop.
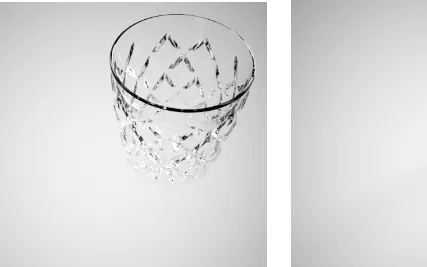
Turbo render is able to maintain reflection clarity at extremely low samples. OIDN required over 4 minutes of rendering to achieve a similar quality.
The image is rendered with film set to transparent to produce an alpha channel. The white background (top of the image) is then added in the compositor to highlight the difference in quality. OIDN required a 4 min render to get close to Turbo Render’s 10 second render result, but there was still visible noise (video to follow)
Scene 2 – Indoor scene to test geometry detail and texture detail.
Above we can see that even after 30 minutes of rendering, OIDN is still unable to retain as much texture detail as Turbo Render can at on 1 min!
Even with a 15 second render, that’s a whopping 120x faster than the 30 min render used by OIDN, Turbo Render can still maintain texture detail using it’s ‘Enhanced Textures’ option:
Above we can see that the bottom of the cupboard area is getting quite badly mangled up by OIDN and even worse with OPTIX. This is because denoisers can struggle with dark edges of geometry that meet with shadows due to a lack of contrast. Turbo Render can achieve much better results using it’s ‘slow (all passes mode), even at very low samples (as shown above bottom right).
Below shows that even when rendering at 1 min per frame (240x less time per frame than the ground truth 4 hours per frame), we can still get excellent results without any noticeable flicker. To do this with OIDN and maintain the same geometry, texture and reflection detail we’d need to render at 30 mins per frame (as can be seen in the above texture comparison still image examples, and youtube video examples athttps://www.youtube.com/watch?v=toManFMUSFQ ).
Notice how turbo render (on the right) has vastly superior image quality when compared to OIDN (left). The most noticeable improvements in this image are the crisp shadows on the notice board and the clarity of the reflections under the desk.
The UI is very simple to understand, and offers options to ensure the best possible results for any scene and sample settings.
Instructions:
Turbo Render is able to reduce render times so dramatically because it can produce high quality renders at samples that are too low for Blender’s render panel denoisers to do a good job with:
Open image denoiser version(left) 1024 samples with noise threshold of 0.01. Turbo version (right) 324 samples with noise threshold 0.1 (ten times more noise). Notice the paint flecks are retained with Turbo, and the skin detail is completely preserved compared to the OIDN blurry results. (right click open images in new tab to see full size image)
With this in mind, always be sure to set the samples as low as you can without reducing image quality. You can do this either by using the sample pre-sets, or using the ‘user’ sample pre-set mode which allows you to enter the sample settings manually.
It’s also important to understand that the biggest gains (often several hours) are to be had on renders that take a long time when not using Turbo Render. Scenes that already render quickly (under a minute or two) can’t be reduced as significantly. For scenes that already render quickly it’s advisable to use the ‘fast/draft’ denoise mode unless you notice wobbly geometry, or if you need to work with the individually denoised passes in the compositor after rendering). Here’s a video explaining the draft/fast mode usage: https://www.youtube.com/watch?v=HzCm_vp6R2M
Turbo Render is designed with ease of use being a top priority. In the Turbo Render Options area, simply click enable, choose a sample preset to automatically set up the sample settings to the desired quality, choose the cleaning mode (combined image or clean passes), tell it what’s in the scene, and render. That’s it! Turbo render will then analyse the scene and other render settings to produce the final render. IMPORTANT ensure a default project cache folder for new scenes is specified in the addon preferences, and that each scene has a valid cache folder set prior to rendering. The scene’s cache folder can be set at the bottom of the Turbo Render options, or in the compositor’s N panel turbo tab. If you the ‘User’ sample pre-set, then to achieve the biggest speed gains, you should reduce your samples below what you would usually need. Turbo Render is so fast because it’s able to produce clean images from noisier render results than other denoisers can. The cache folder must not be a relative path (a path that starts with ‘//’), so when setting it, make sure you uncheck the relative option in the Blender file explorer as shown below:
Turbo Render is compatible with:
Still renders
Animations
Existing compositor trees (no matter how complicated)
Rendering of multiple scenes and view layers from a single compositor (all scenes will use their own Turbo render settings).
All Turbo Comp features (caching, publishing, resaving file output nodes without re-rendering etc)
Options:
Denoising Modes –
Draft (clean image pass only) – The new draft mode offers extremely fast denoising, and when combined with the ‘enhance textures’ option will provide results that could be considered to far surpass what would be expected of a draft render, even at extremely low samples. Also suitable for final renders which render to a denoisable level in under 10 seconds, thanks to it’s fast processing times.
Medium (clean image pass only) – The medium option is slightly slower than Draft, but on noisier images will offer better all round detail, particularly in reflections.
High (clean image pass only) – The high mode will offer the best lighting, shadows and reflections of all but the ultra mode. This is suitable for final renders where the individually denoised passes aren’t needed for compositing.
Ultra(cleans all necessary passes)- This will clean individual passes for use in the compositor afterwards, and can also be used to resolve any geometry wobbliness present in lower pre-sets. The passes which are cleaned is decided by scene content and render settings. This mode can also be used if the other modes are not producing good geometry detail. IMPORTANT – If you intend to use the individually cleaned passes in a 3rd party compositor, you can either use the render layer cache exr’s found in the cache folder you set, or if you prefer another format, you can set up a file output node directly from the render layer node. Blender’s output can be set to something light such as a ffmpeg because it’s only able to output the denoised image pass, not the other denoised passes. If your passes include data passes such as cryptomattes, it’s advisable to use EXR 32 bit.
Cycles Speedup Options –
Optimise HDRI – This will optimise the importance map, leading to potentially faster renders and less RAM usage. The improvement will be most noticeable with HDRI world environments which are 8k or above, and will reduce memory consumption during rendering by around 1GB for a 16k HDRI.
Prevent Fireflies – Recommended. This will reduce the chance of fireflies and also provide a potentially massive render time reduction (scene dependant).
Sample Pre-sets – A quality level for every occasion. No more messing about trying to find the ideal render sample settings, simply choose the desired quality and hit render. Modes include: Crap, Medium, High, Ultra, Insane, User. For animations you may want to use your own sample settings, as these have been optimised for fast still images. Using them for animation may cause inconsistencies between frames.
Recommended minimum sample presets to use for each denoise mode:
Very Dirty – Very dirty should be used if you’re using very low samples or still have noise in the image after it’s been denoised.
Interior Scene – Adjusts the render pre-sets to produce better results for interior scenes or scenes with a lot of indirect illumination.
Animation- This will optimise your chosen sample pre-sets for animations.
Enhance Textures – This will ensure that texture detail is maintained even at very low samples. In draft mode it will also improve reflections and shadows.
Visible to Camera – Use these options to specify what the camera will be able to see. This in combination with various other render settings (light bounces, film etc) enables the system to choose the optimal approach to ensure the best results. Uncheck what’s not needed to ensure the fastest processing time. Turning on Heavy DOF/Motion Blur, Emission, and enabling the ‘behind volume’ sub options is not always necessary (particularly at higher render settings), so try leaving those off for increased performance, only enabling if you notice noise around the edges of objects, or noise behind volumes.
Problem Solving – Automatically fix common rendering issues if they’re visible after rendering. Only enable if you encounter problems, because if the problem isn’t present the workarounds will be detrimental to rendering speed or glossy levels (depending which you enable). IMPORTANT – If you enable the ‘swirly/blotchy artefacts’ option, and you also have the ‘animation’ option enabled in the turbo render options, then it’s advisable to change the sample pre-set to ‘user’, disable the noise threshold checkbox, and set your own samples. The reason is, when the swirly artefacts option is enabled, adaptive sampling is disabled, meaning the max samples will be used for each pixel, and because the animation options increases the max samples to at least 600 (even for crap sample pre-set), you’ll have potentially unnecessarily long render times.


Post Comment