Blender 4.2 | Face Layers v1 – streamline 3D modeling Addon Download
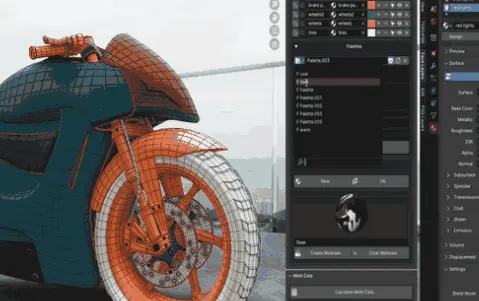
Introducing Face Layers, a powerful Blender add-on designed to streamline your 3D modeling process by allowing you to manage, select, hide, lock and assign materials to individual face layers and more with ease. Whether you’re texturing, weight painting or organizing complex models, this add-on gives you full control over your Face layers—all from a simple, customizable UI.
=========================================================================================================
If you’re looking to quickly select or hide faces to gain better control over your complex model while painting, this add-on is perfect for you. But that’s not all—it comes with several other powerful features. Let’s dive in and explore!
Let’s begin with a quick introduction to showcase the capabilities of the add-on. Face Layers add-on is divided into three main sections: Face Layers, Mesh Data, and Mesh Errors.
Mesh Errors allows you to quickly identify and resolve any errors in your mesh on the spot.
Mesh Data provides a detailed spreadsheet of your model, listing each face layer and showing the number of faces, triangles, and ngons it contains. You can easily select them by simply clicking on the corresponding number.
Face Layers let you create and manage layers with ease. You can select, hide, and lock layers directly on your model, or manage all unlocked layers at once with a single click to select , hide and delete them. Move layers up or down, rename them, assign materials, change colors, and more.
The Materials Panel allows you to quickly create a new single material or choose any material from your Blender file and apply it directly to a face layer by clicking on your model. You can create and assign multiple materials to each face layer with a single click, which is useful for creating ID maps or randomizing colors as we’ll explore later. You also have the option to clear materials, with the choice to either keep them in the file or permanently delete them.
The Palettes Panel is similar to Blender’s default, but with two added features:
Paste Hex Colors: If you’ve used our PSD Layers add-on before, you’ll recognize this feature. It lets you copy any color palette from the internet in any format and paste it with a single click to create your custom palette.
Randomize Materials Colors: This feature randomizes the colors of each face layer’s material, using your palette colors or simply picking random colors if no palette is available.
To quickly access your layers and commands, the add-on includes a default pie menu. Simply press Ctrl + Shift + Alt + F to bring it up. You can also customize this shortcut, which we’ll cover later.
Lastly, you can fully customize your UI to fit your needs. Show or hide specific attributes, and modify names, materials, colors, and size as you prefer.
That was a quick introduction. Now, let’s dive into a detailed demonstration of the add-on.
Let’s begin by installing the add-on. First, go to Edit > Preferences, select the Add-ons tab, and click Install. Navigate to the folder where you downloaded the add-on, and select the .zip file without extracting it. Click Install Add-on, then make sure to enable it. Once installed, you’ll see the new Face Layers panel in the 3D viewport, and the add-on will be ready to use.
To create a new layer, simply click Add Face Layer. First, switch to Edit Mode, select the faces you want to add, and then click the plus icon. To remove faces from a layer, select the faces and click the minus icon. You can rename your layer, assign a material, and change its color if desired. For now, let’s focus on creating and renaming all the layers, and adding the faces without applying any materials.
After creating layers and assigning corresponding faces, there are a few important points to keep in mind before moving forward:
– Each mesh object has its own face layers data, so make sure you have the correct object selected before adding or editing layers.
– New layers are always added to the top of the stack. Be mindful of which layer you’re editing, and consider naming your layers to keep things organized.
– Face layers work specifically on faces, For example with a sphere, you can create multiple face layers, but you can’t just create multiple objects from it .. and the same applies to complex characters with multiple assets, that’s why you can’t replace the add-on by just separating your mesh parts and control them from the outliner.
Now, let’s return to our layers and start by checking the mesh for any potential errors. Navigate to the Mesh Errors panel and click Scan Mesh for Errors. If errors are found, clicking on the error count will select and highlight the exact location of the issues. You can then click Delete to remove any loose faces, edges, vertices, or even zero-area faces.
We can also inspect our mesh data. Head over to the Mesh Data panel and click Calculate Mesh Data. The add-on will display each face layer, along with the number of faces, triangles, and ngons it contains. To easily select any of these elements, just click on the corresponding number.
This allows you to easily spot triangles and ngons for editing, and identify which layers have too many faces, so you can optimize your mesh efficiently.
Downloads: show love to dev by purchasing if you can afford it
IF THE LINKS ARENT WORKING, THEN PLEASE ACT LIKE A GROWN UP AND MESSAGE ME/ COMMENT HERE OR ON DISCORD AND I WILL UPDATE THESE LINKS QUICKLY! MAKE SURE YOU DOWNLOADING PROPER FILE WITH PROPER EXTENSION LIKE .ZIP OR .RAR
Filename:Face_Layers vfxMed.zip – 43 KB
Official Discord : https://discord.gg/M2kqB4M9tG
Recommended link below => FULL SPEED.
USE IDM FOR FASTER DOWNLOAD.
https://www.file-upload.org/qf0gndkvgpx1
USE BRAVE BROWSER TO DOWNLOAD WITHOUT ADS AND QUICKLY!
MIRRORS:
for mega and g drive links – contact admin.


Post Comment