Blender 3.5 Guide Mesh – Final Mesh Editor v1.4.1 Crack Download
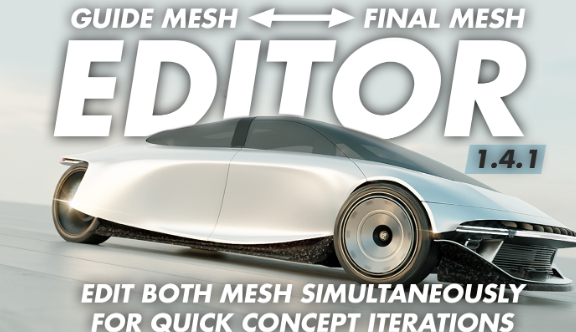
GUIDE MESH <> FINAL MESH EDITOR V1.4.1
The ideal companion for Hard Surface/Vehicle Modelers using the Shrinkwrap method.
Release Notes:
Plugin Version
Status
Function
Description
1.4.1 New Optimize for animation If you want to animate your WIP design – tick this box to temporarily disable all shrinkwrap modifiers, set all subdivision modifier levels to 1, and set your texture quality to 128The Guide Mesh <> Final Mesh Editor is a valuable tool for hard surface modelers who rely on this technique but are looking for a less destructive, more concept modeling-friendly approach. Originally built as a simple script intended to edit both Guide Mesh and Final Mesh at the same time, it is progressively evolving into a suite of useful shortcuts and presets that should help you generate panel gaps, vents, and other simultaneous transform and edit operations.
Surface with cutline: without and with shrinkwrap modifier on
Why did I create this addon?
After watching the CGMasters tutorial and using the famous Shrinkwrap modifier regularly, I realized that the process was not entirely optimized for concept designers working on work-in-progress designs, where proportions and details are not necessarily set in stone from the beginning. Although Booleans remain the quickest way to create cutouts, they are known for being inconsistent and can mess up your topology. That’s why I decided to create an add-on that makes the tutorial compatible with WIP designs, allowing for quick iterations while maintaining detailed surfaces and without any topology issues. Here is a comparison table between the different workflows available:
What does the script do?
It provides you a set of useful shortcuts available via a Pie Menu, which facilitate simultaneous on-the-go editing, retrofitting or readjustment of both the Guide Mesh and Final Mesh.
Is it easy to use?
Although the script requires a little time to adapt, it is a very straight forward pie menu (CTRL+Shift + Q) which offers you a bunch of functions that all revolve around the same goal: to make your life easier while working on WIP design of yours.
Typical worfklow?
(It is still good to keep the habit to work on your guide mesh for as long as you can)
Setup your Guide Mesh / Final Mesh relationship
Begin detailing your Final Mesh
Tweak both meshes with Dual Mesh Edit. Either use the lasso selection tool to pick overlapping geometries, or use “Select Matching Geometries” if you are focusing on one mesh at a time
Create panel gaps and shutlines’ bevels using the Bevel Weight shortcut
If there is some mismatch between your meshes, use ‘Autosnap’ (available in Dual Mesh Edit Mode) or Snap’Adjust (available in Object Mode)
Backup and Bake your Final Mesh
FEATURES
A simple pie Menu
The script consists of a simple pie activated with CTRL + SHIFT + Q. In both Object Mode and Edit Mode, some functions are actually sub-menus.
Guide Mesh <> Final Mesh Setup
Start the Guide Mesh <> Final Mesh setup either from one or two existing meshes. The script will: rename the meshes, add the required modifiers and vertex groups, parent them and assign them to their respective collections. It will also make the Guide Mesh invisible in Render Mode, and display it in wireframe.
Dual Mesh Edit Mode
This mode allows you to edit both mesh at the same time (use the lasso tool in X-ray view). By doing so, you can select overlapping geometries across both mesh. Dual Mesh edit mode will store your Mesh’s visibility settings – so if you work with your Guide Mesh hidden in object mode, it will store its state and restore it once back to object mode.
Blender’s X-RAY view: Alt + Z
Machin3tools pass through mode: Tab (bottom right corner)
Isolate Mesh
Working on two very similar meshes can get confusing. While in Dual Mesh Edit Mode, this function allows you to isolate the mesh that you want to focus on. It displays a text at the top of the viewport as a reminder.
Select Matching Geometries
Based on your selection, it detects the matching vertices, edges and faces on the other mesh. Can be useful when you want to do design changes requiring extrusion or beveling on both mesh at the same time. Keep in mind this tool is purely based on geometric coordinates, so any vertices, edges or faces present in one mesh only, will not be synced.
AutoSnap’ – Edit mode only
Think of it as an automated version of the Snap’Adjust mode down below. While in Dual Edit Mode, use this function to Automatically snap any vertices from one mesh to another, within a certain threshold set in the addon preferences (default threshold is 1mm). In the example below, I intentionally misplace a vertex on the Guide Mesh, then use the Autosnap’ (Guide onto Final) feature (it snaps back to the nearest vertex from the Final Mesh).
Snap’Adjust Mode (Manual Mode)
This oddly satisfying mode makes one mesh non-selectable, but enables you to snap the vertices of the other mesh onto the locked mesh (vertex and edge snapping are enabled by default). Use this in case AutoSnap’ creates unwanted snapping results.
Vent Creator (Alpha)
The Vent Creator is a tool that performs a series of operations to provide a good topology for creating an extrusion to your final mesh. It creates an additional edge loop around your selection, with an outset of 1mm, and extrudes your original selection multiple times in the desired axis(X, -X, Y, -Y, Z, or -Z). It will also assign your original selection and every new extruded edge to a “Vent” vertex group which is excluded from the Solidify and Shrinkwrap modifiers. As the surface transition depends heavily on your mesh, the “Edge Transition Helper” is a shortcut that temporarily turns on all modifiers in edit mode, allowing you to adjust the weight of your vertices to see the effect in real time. It is recommended to focus solely on the original selection’s vertices.
Other features:
Optimize for Animation: temporarily disable all shrinkwrap modifiers and reduce subdivision levels to 1 for smoother animation previews
Find Nearest Preset Viewpoint: detects the orientation of your current 3D viewport and snaps it to the nearest preset orthographic viewpoint
(Edit Mode) Zero Out: scaled the selected geometries down to 0 on the X, Y or Z axis (flattens it basically)
(Edit Mode) Edge Menu: shortcut to set/remove Bevel Weight and Crease to the selected edges
(Object Mode) Backup and Bake: creates a duplicate of your Final Mesh in a locked “Archive” collection, then bake every modifiers on the original Final Mesh
(Optional – Object Mode) Restore object’s viewport display settings: in case you want to reset your selected mesh’ viewport display settings


Post Comment